S E E D L I N G R E Q U E S T S --
Adding a Seedling Request - Part 1 |
|
|
|
This section will look at the basic steps required to add a seedling
request.
How to Begin
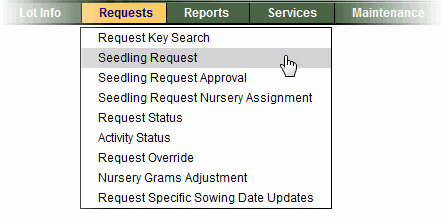
Click on the Requests tab and select Seedling Request.

|
|
Step-by-Step Instructions -- Part 1
The basic instructions for adding a seedling request are very simple.
Learning about the way some fields are designed to work may take
a little more time. Detailed information about some fields has been
included below in the Fields to Know About section. For more information
you can refer to the Online Help feature within the SPAR application.
View Seedling Request
screen. |
Top of Page |
|
1. |
Enter all of the required fields (marked with an asterisk) and any
other information related to your request. |
|
2. |
Click the Go to Lot Selection button. |
|
3. |
Review the messages at the top of the screen and make changes to
your information if you did not successfully go to the Lot Selection screen. |
|
Seedling Request Screen -- Fields to Know About
The Seedling Request screen is very long so the descriptions
have been divided into 5 sections based on the similarity of content added to the screen. The following list will help you understand
how each set of information will be used.
1.Administrative used to identify the Request
Agency and funding source.
2.Tenure used to identify management unit information.
3.Planting Site used to confirm suitable Seedlots
or Vegetative Lots are ordered.
4.Sowing Details used to identify the amount
and type of seedlings you are requesting.
5.Additional Criteria used to get information
about a specific lot, this information is optional.
For each of these 5 sections we have included an excerpt of the
screen to help you explain rules related to the fields.
|
|
1. Administrative Information
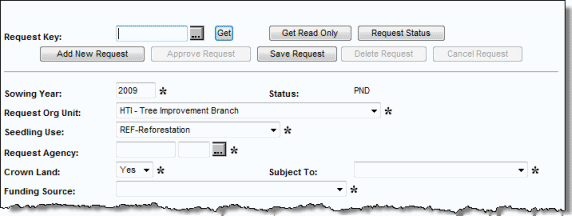
The following screen capture represents the top of the Seedling
Request screen. The information we are referring to as "Administrative"
in nature appears below the following fields:
- Request Key used to quickly get a seedling request already
entered into SPAR.
- Sowing Year indicates the year the order is to be sown.
- Status used to indicate the status of the seedling
request. See the Request Tips and Troubleshooting section for a detailed
description of status.
Seedling Request Screen (excerpt 1 of 5)
 |
|
|
SPAR will use your User ID to identify you and will automatically
default the Request Org Unit field to the correct District or
Branch for ministry users or the Request Agency field to the correct
client code for non-ministry users. |
Top of Page |
|
2. Tenure Information
The Tenure section can be expanded or contracted by clicking the + or -. The following screen capture represents the expanded Tenure section. Only the mandatory fields of Management Unit Type and Unit ID are displayed when this section is contracted.
Seedling Request Screen (excerpt 2 of 5)

In a request, you must enter one of the following fields, or combination
of fields, depending on which information you have:
- Opening
- Licence No. / CP / Block
- Timber Mark / Block
- Management Unit Type (and Management Unit ID for a TSA
or TFL) - this is the minimum information that must be entered.
|
|

|
If you type in any of the items listed
above, then scroll to the bottom of the screen and click the Go to Lot
Selection button, the management unit information will automatically update
based on the opening or licence information.
|
|
Top of Page |
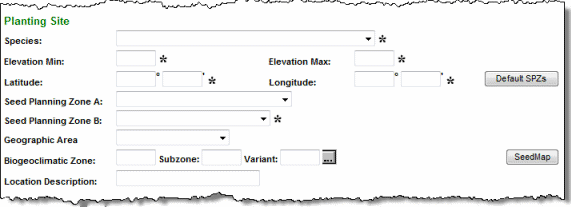
3. Planting Site Information
This information will help SPAR return a list of suitable lots for you
to select from.
Seedling Request Screen (excerpt 3 of 5)

There are two buttons in this section which function as follows:
- Defalt SPZs -- click this button to automatically populate the Seed Planning Zone field(s) and the BGC Zone, Subzone and Variant. The details displayed will correspond with the planting location information you have entered. Note that you must enter the Latitude and Longitude fields in order for this button to function.
- SeedMap -- click this button to open the SeedMap Application in a new browser window. SeedMap opens to display the geographic location of the planting site that corresponds with your request.
Also, remember:
- The Location Description field is a free text field for you to enter
information which will help you keep track of which location you
are making this request for. This could include your agency's
own names for the planting site.
- Seed Planning Zone A is required for species that have Class
A orchards under production or development. For interior species this
includes: Sx, Pli, Pw, Lw, and Fdi. For coastal species this includes:
Fdc, Cw, Hw, Pw, Yc, Ba, Ss.
- Seed Planning Zone B indicates the SPZ for the planting site
applicable to Class B species.
- Elevation Min/Max indicates the elevation of the Planting Site. The difference between the two
fields cannot be greater than 400m.
|
Top of Page |
4. Sowing Details
Use this section of the screen to indicate the quantity and
stock type information for the seedlings to be produced in the nursery.
Seedling Request Screen (excerpt 4 of 5)

The Nursery Requested field is not identified as a mandatory field however
you should enter a nursery before you change the status of the seedling
request to APP (approved).
|
Top of Page |
5. Additional Criteria
The information in this area of the screen is optional.
Seedling Request Screen (excerpt 5 of 5)

Use the Lot Number(s) field to include a specific lot number
in the Lot Selection screen.
|
Top of Page |
|
Now that you know how some of
the fields work behind the scenes, click Forward
to learn how to complete the request process. |
|
|
|

